
9 Popular Studio Light Modifiers Explained
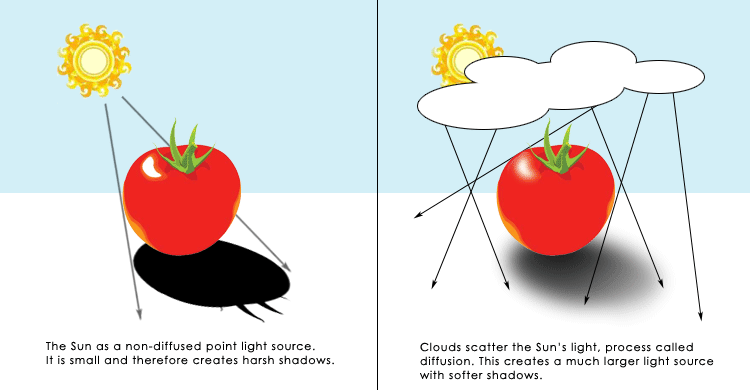
As a follow-up to last week’s survey of studio light sources, today we’ll focus on light modifiers, which can be used to modify the light’s strength, direction, color, pattern, and shadow falloff. Before I talk about the equipment, let me explain the importance of the relative size of the light source to the subject. The smaller the light source, the harsher the shadows and contrasts will be. Take the Sun on a clear day, for example. Though the Sun is huge in reality, it’s a small, bright light source shining on the much larger Earth. Consequently, when you look at your object, you’ll see strong contrast and dark shadows and harsh edges. When the clouds roll in, look at the shadows again: They’ve softened and have more attractive, gentle feathering at the edges. Contrast has also been reduced. The clouds have scattered the light rays, diffusing and softening the light. Note that the clouds have effectively increased the size of the light source relative to the subject. See the diagram:
Softer light is generally a desired effect when working with all subjects, from people to highly reflective objects like jewelry, which is my specialty. The specular highlight-- the bright spot on an object--is usually more pleasant when created by soft lights.
Umbrellas:
Similar to rain umbrellas, but without the handle, umbrella modifiers are very affordable and are found in most studios. They come in several sizes and varieties: black outside with white or silver interiors, all white (called shoot-thru), and specialized ones with gold or zebra patterns (white-silver-white-silver) on the interior. The basic concept is that when a light is pointed at the center of the umbrella, the light rays are reflected back and scattered or diffused. Umbrellas are the ultimate in portability and speedy setup. Common for people photography, they’re great for group coverage when two are used.
In the product photography studio however, the umbrella generally isn’t your best choice. The inherent problem is light spill—lack of control over the light. Since the diffused light spreads out over a large surface, you would need to use “flags” or black cards to block the light from certain areas of your image.
Softboxes:
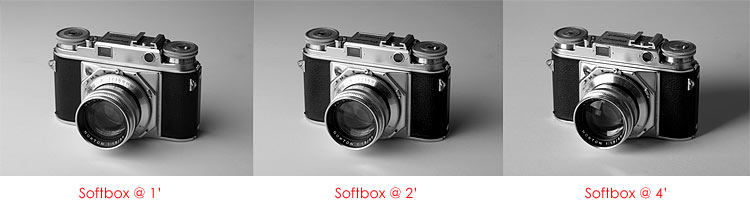
Softboxes produce soft controlled directional light. The image above demonstrates the effect of moving the light source away from the subject. As stated in the beginning, the larger the light source appears to the subject, the softer and more diffused the light becomes. Take a look at the shadows and contrasts in the above images.
Softer light is generally a desired effect when working with all subjects, from people to highly reflective objects like jewelry, which is my specialty. The specular highlight-- the bright spot on an object--is usually more pleasant when created by soft lights.
These light modifiers are the workhorses in our studio. Softboxes work similarly to umbrellas by scattering and softening the light, but in quite a different manner. They are rectangular boxes made of opaque, black material on the outside, lined with diffusion material on the inside (white or silver), and usually have an additional white diffusion panel called a baffle, which sits several inches away from light. The front of the softbox is open but kept covered with one more layer of white diffusion material. This produces a very soft light source and, because of the design, light is directional and therefore controlled. Should a photographer need additional control, most good brands have a grid that can be fastened with Velcro at the front. Softboxes produce a rectangular catchlight on the subject.
On the negative side, softboxes are big and bulky. For onsite shoots, you’ll have to take them apart, unless you have a minivan or SUV. Some brands are easier than other to assemble, but generally they’re a pain in the neck and since time is money, might not be worth the effort. They cost substantially more than umbrellas and can strain a beginner’s budget, depending on the brand and size. Softboxes come in many shapes and sizes, ranging from small ones that can be mounted on camera flash guns to enormous ones used to illuminate cars and trucks. Our studio is equipped with several 24" x 36" and 30" x 60" softboxes.
Octoboxes:
They are basically the same as a softbox except they have eight sides rather than four. They are very popular in fashion and portrait photography. Quite large, they can be unwieldy, measuring from five to seven feet. The catchlight they produce is similar to the umbrella’, multi-sided and octagonal.
Beauty dishes:
A very simple device, a beauty dish looks like a bowl that fits onto your light with a small plate that reflects the light back onto the sides of the dish. It is used most often in beauty/cosmetic and glamour shoots. It produces a light that is in between a bare studio light and a softbox: the shadow/highlight transition is more abrupt, giving it higher contrast. Because of this, the beauty dish tends accentuate flaws in your model's skin, so attention must be given when placing the light. It works best between three and four feet from the model, giving what many call a "liquid wrap-around lighting." The beauty dish produces a circular catchlight. In my jewelry photography, I sometimes use them when shooting pearls because they produce round highlights.

The above image compares the contrasts, highlights and shadows created by the different modifiers. Notice how harsh and contrasty the bare studio light image is.
Color gels:
A color gel is a transparent, colored sheet placed in front of a light or used in combination with other modifiers such as a grid. Used extensively in all areas of studio work, color gels give depth, dimension, and a mood to images. Available in just about every color on the spectrum, they are an essential part of a functioning studio. They’re also cheap, so have fun experimenting. I love them!

In jewelry photography, I have to try to give more life, or apparent depth to the products: A touch of colour can go a long way. Here are two beauty shots for TungstenWorld.com.
Grids:
Grids are modifiers that attach directly to the front of the studio light's small, conical reflector. They focus the light into tighter beams and change the shadow edge feathering. They usually come in 10°, 20°, 30° and 40° hole-patterns. A 10° grid produces a very narrow beam of light with sharp shadows, while a 40° grid produces a broader beam and softer edges. We use grids frequently in the studio. They can be used to add a bright highlight to a particular area of the subject or, when mounted onto a background light, to create a circle of light on a background. In fashion/people photography, they are often used to light the model’s hair.
Barn doors:
Barn doors have been around for decades and are simple black, metallic flaps that you mount at the front of your light to control the direction and width of the beam. They produce somewhat harder shadow edges than grids do. You can manually change the size of the beam by opening and closing the doors. The light shape produced is rectangular. They are commonly used for background lighting and sometimes to light a model’s hair.
Snoots:
This fixed cone-shaped device also mounts to the front of your light. It creates hard shadow edges and, when used on backgrounds, produces circular shapes. A snoot is sometimes used to give a spotlight effect on objects or highlight a specific region of your image. We have rarely used them in our studio.
Gobos:
A gobo is modifier that creates a light pattern. They are usually metallic or glass-etched and are available in a multitude of different sizes and shapes. They’re mostly used on background lights to create interesting backdrops, such as light passing through a window or a mottled effect. The Batman spotlight is a famous gobo example.

Here's an image where multiple modifiers are interacting together
What happens when you put some of the above together? You can paint your subject in gorgeous light. The above photo's details: 5D Mark II, 50mm f1.4 lens; 2 sofboxes; 1 background light with grid creating backlighting into the veil; and 1 hair light with barn doors.
That concludes this part of Beginner's Corner. In my next blog, I will share a conversation I had with a Facebook user about what it takes for a career in Photography and/or Design.